
A professional step-by-step guide to installing and setting up your DMA card for optimal performance and security.
What You’ll Need
Before starting, ensure you have the following components ready:
✔ Our DMA Card
✔ USB 3.0 Cable (for connecting the DMA Card to the second PC)
✔ Fuser (if required for screen overlay)
✔ KMBox or MAKCU (for enhanced mouse movement)
✔ Second PC or Laptop (also referred to as the “radar” PC)
✔ Primary Gaming PC
✔ Screwdriver (for installing the DMA card)
Cables is included with all our products. Check out our bundle offer to get the best price on everything you need.
✔ Donwload all Drivers & Tools needed for our setup guide here: download
This includes all the drivers & tools you need to complete this enttire guide.
IMPORTANT:
When flashing the firmware, follow instructions exactly as told, everything mentioned there has a purpose, dont ignore any steps. If you’re unsure, contact our support on discord.
Remember: to flash the firmware when connected to the JTAG port. When you have finished the flashing, you NEED to shut down your computer, unplug the power cord and switch to the data port of your DMA card.
JTAG: is the port closest to your motherboard.
DATA: is the one furthest away from your mother board.
Step 1: Installing the DMA Card – Your DMA Card Setup Begins Here
DMA Card Installation:
First, shut off your computer completely, and unplug the power cable.
On your motherboard locate a PCI-Express slot. Located underneeth your GPU.
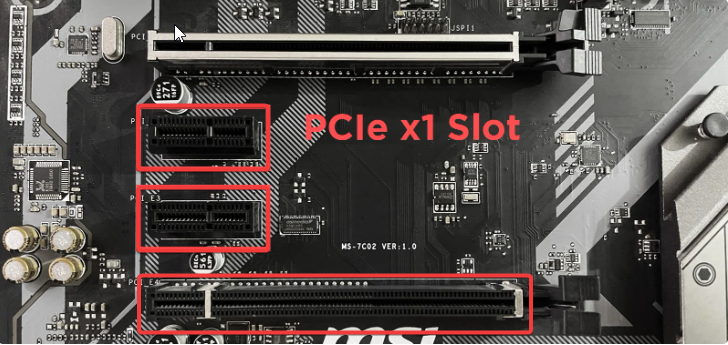
Insert the DMA card into a PCIe x1/x4/x8 slot, and screw it securely into the case.
BIOS Configuration:
(recommended addititonally for your second computer)
For AMD:
Disable IOMMU
Disable Virtualization & SVM
For Intel:
Disable Virtualization
Disable VT-d
Ensure the DMA Card installation was successfull:
Once you have installed the DMA Card and made the changes in your BIOS settings, connect the USB 3.0 into your DMA Data port, and the other end into your second computer.
On your second computer, go to your device manager and verify that “FTDI FT601 USB 3.0 Bridge Device” is found under “Universal Serial Bus controllers”
If you see FTDI FT601 USB 3.0 Bridge Device correctly in your device manager, you may now proceed to
the next step.
If you dont see it try unplugging the USB3.0 cable connected your DMA card, and look for a driver that dissapear, and install the drivers for that device.
Should you have any issues with the installation, just contact us through discord we’re always ready to help 🙂
Step 2: Flashing the DMA Card and installing the Firmware
Flashing is required to install firmware onto the DMA card, enabling its full functionality and privacy features.
Its important to follow these steps exactly as written to ensure everything goes smoothly.
- Connect the USB-C Cable to the JTAG port (JTAG is closest to your motherboard)
- Restart your computer. (Important)
- Switch the USB-C Cable to the JTAG Port
- In the downloaded folder, open the Flash-tool-driver > CH341PAR > & run Setup.exe
- Complete the installation.
- In the downloaded folder, now navigate to flash-tool > CH347FPGATool > & run CH347FpgaDownloadTool.exe
- Select the Correct DMA Card Type
- Choose xc7a75T for our DMA cards.
- Switch Firmware Format
- In the Flashing Software, change the format from bit to bin.
- Select & Install the Firmware
- Click “Select Firmware”, browse for the firmware .bin file.
- Ensure everything looks the same as the image below, then proceed to click “flash” when you see the message “Close CH347” you may now close the firmware.
- !!IMPORTANT!!
- Turn off your Main/Gaming PC, and unplugg the power cord, for at least 30 seconds. This is an important step to esnure everytthing goes smoothly.
- IMPORTANT: Unplug the USB-C cable from your DMA Card, and plug it back into the DATA port, the one furthest away from the motherboard.
- When you have moved the USB-C cable to Data port and unplugged your computer, you may now plug it back in and turn your computer back on.
- Turn off your Main/Gaming PC, and unplugg the power cord, for at least 30 seconds. This is an important step to esnure everytthing goes smoothly.
Step 3: Installing KMBox NET
The KMBox Net enhances mouse movement and data synchronization between PCs.
- Connect the KMBox
- Plug a USB cable from the top left slot of the KMBox to the second PC.
- Connect another USB cable from the bottom left slot of the KMBox to the gaming PC.
- Then connect your mouse USB cable to the KMBox.
- Install the KMBox Driver
- Download and extract the KMBox NET driver on your second PC.
- Inside the extracted folder, locate and run WCHUSBNIC.EXE.
- Complete the Driver Installation
- Click the large “INSTALL” button inside the driver installer.
- If you encounter any errors, reach out to our support team for assistance.
- Restart your Second PC
- Configure the Network Settings
- Open Control Panel → Network and Internet → Network and Sharing Centre → Change Adapter Settings
- Find the KMBox NET Network Adapter, right-click, and select Properties.
- If the adapter isn’t visible, unplug and reconnect the KMBox NET, look for the device that appears when you plug it back in.
- Adjust Network Settings
- Disable “Internet Protocol Version 6 (TCP/IPv6)”.
- Enable “Internet Protocol Version 4 (TCP/IPv4)” and click Properties.
- Configure the IPv4 settings exactly as shown in the image bellow, and click “ok” then click configure and confirm.
- You may now additionally test the KMbox connection with the program in tthe same folder in the KMBox Net Drivers > KMBox test & then run kmbox-tester.exe, if you have an issues, double check you did everything correctly. If it still doesnt work, please contact our support for assistane.

Step 4: Installing the FTDI Chip Driver & Speed Test
- Download and Install Required C++ Redistributables
- Complete the installation
- Install the FTDI Driver
- Navigate to FTDI Chip Driver > ftdibus3-driver > & run fttd3.exe as Administrator
- Restart the Second PC
- Test connection & speed
- Plug your DMA card’s USB cable into a USB 3.0 port on the cheat PC for full speed.
- Make sure the cable is plugged into the data port on your DMA card.
- Navigate to > FTDI Chip Driver > DMA Speed Test >& run lome-dma-test.exe
- Complete the test, if everything is done correctly according to our guide, you are now ready to proceed with using your prefered software tools, for an exceptional experience.
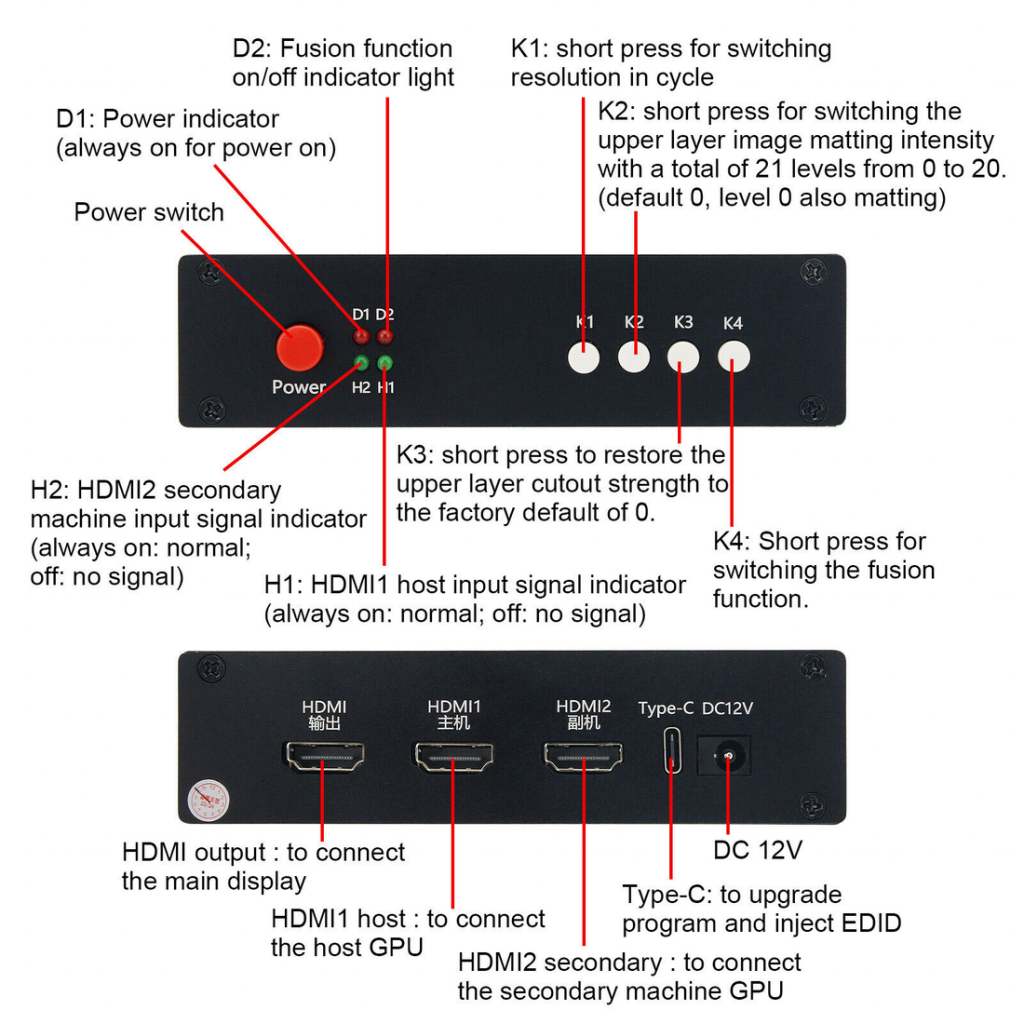
Step 4: Connect the Fuser (if needed)
The fuser is plug and play, connect the HDMI cables as shown in the image below and use it according to your needs.
Congratulations!
Everything is now set up and ready to use in any game supported by your firmware.
If you have any questions, don’t hesitate to reach out—we’re here to assist you. Whether you need guidance or hands-on help, we can also provide support through TeamViewer for a smooth and easy prcocess.
We wish you the best of luck further on your DMA adventure! <3
Join us on discord to stay in touch and ask us anything! Discord
View our cheapest bundle offers here & create your own.
DMA Hardware Bundle | DMACards.pro
Frequently Asked Questions (FAQ)
What is Flashing and Why is it Necessary?
Flashing is the process of installing firmware on your DMA card. This firmware enables the DMA card to function correctly and enhances its security by removing traces of the card from your system.
Can I Flash the DMA Card Myself?
Yes, but it’s not recommended unless you are highly experienced. Incorrect flashing can brick your DMA card, making it unusable. We offer flashing via remote support (TeamViewer, AnyDesk, etc.) to ensure proper installation.
How Do I Update the Firmware?
Firmware updates are applied by flashing the card again with the latest version. Contact support if you need help updating your firmware.
Final Notes
DMA installation requires careful execution, but when done correctly, it ensures seamless integration and optimal performance. If you’re unsure about any steps, please contact our expert support team for guidance before proceeding.
Need Assistance?
For the fastest support, contact us on discord and open a ticket, we will assit you as soon as possible.
You may also reach us through our supprot Center.
📩 Support Centre: Support Center – DMACards.pro
💬 Join us on Discord: Discord
By following this guide, you can ensure a smooth and successful setup of your DMA hardware!